Tuesday 28 November 2017

Later Imperial Roman vs. the Early Vandal

The Vandals have appeared in the ‘Migration to Kingdom’ campaign series which focused on the crossing of the Rhine and ending with their reaching Hispania. In this match series we will have an opportunity to add allies, principally the Alani.

Rome are defending an arable region of the empire in the first game. The compulsory plough has replaced the BUA and a river, one wood and difficult hill are the additional selections.  

Game 1
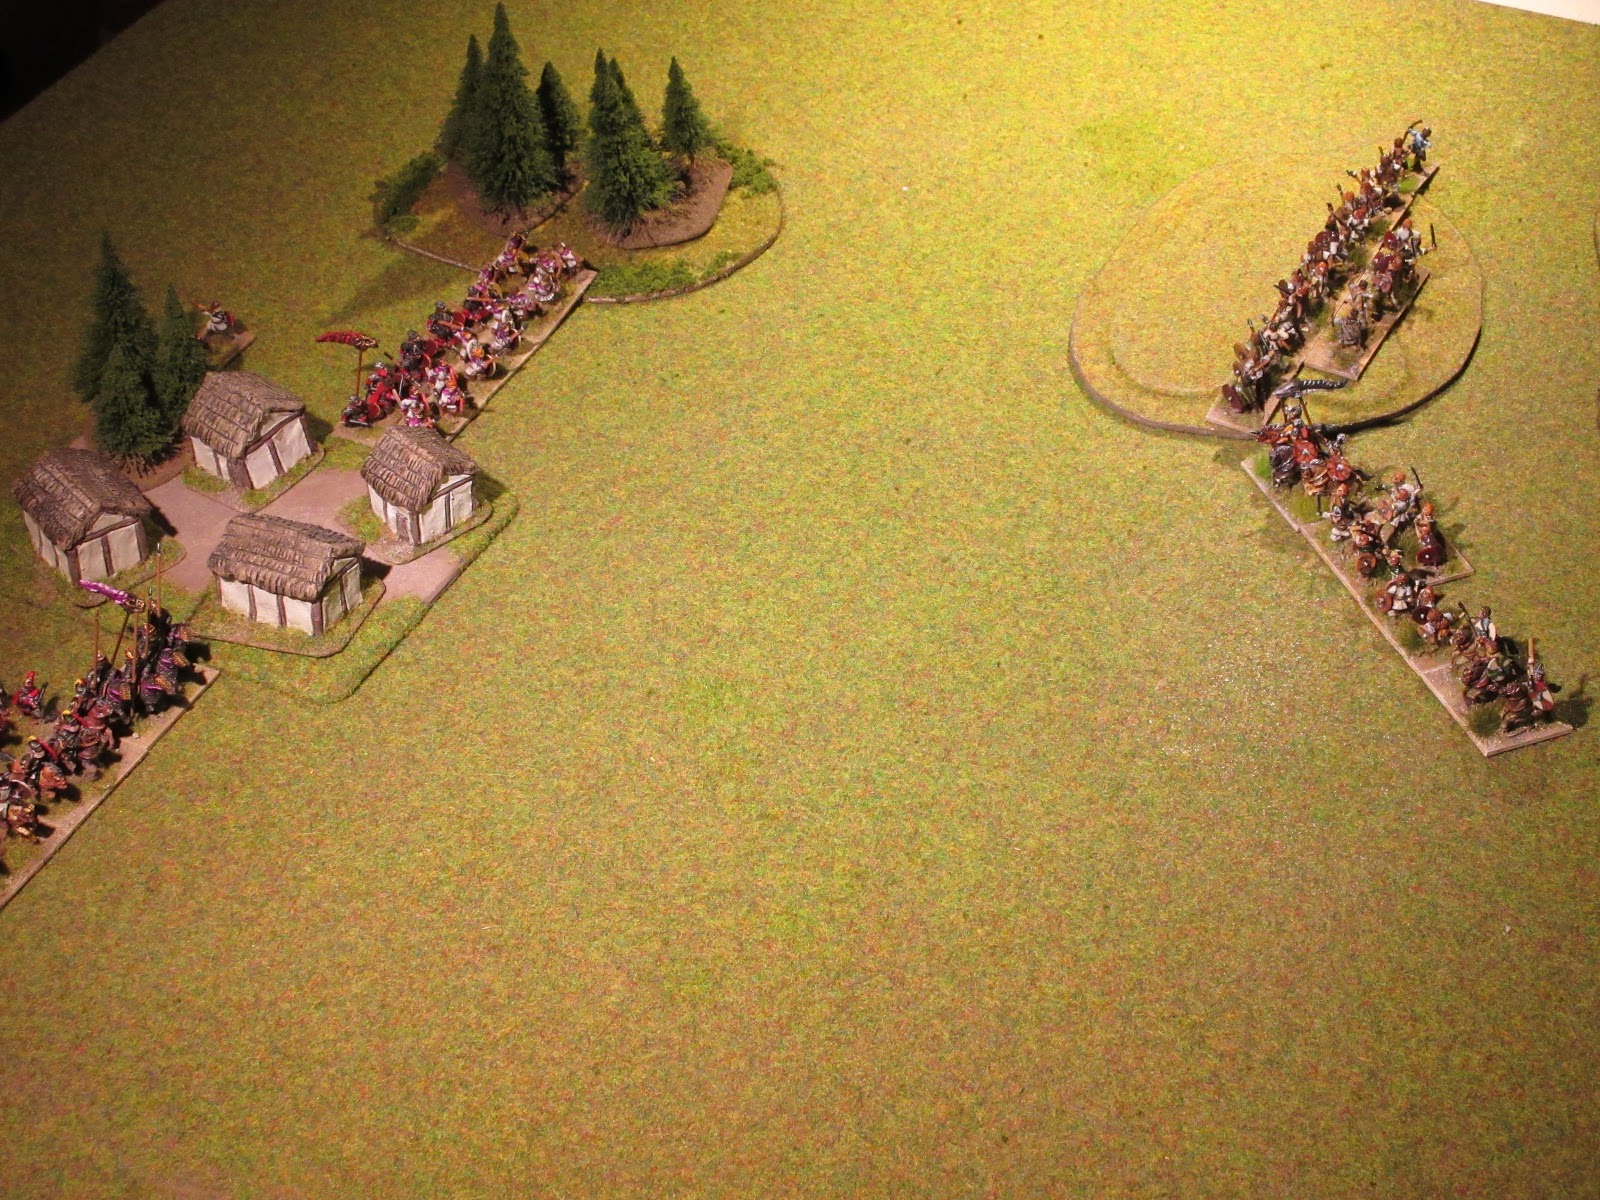
Rome as the defender placed the infantry facing the hill as this would be the primary objective for the auxilia palatina. The legion would support the effort while all the cavalry were positioned as a reserve. 

The Vandals would use the hill to secure their left with their warband while all the cavalry and Alani allies extended the line toward the river.


The auxilia reach the base of the hill seeing light opposition they will ascend the height. The Vandal chieftain finding the Alani less than cooperating (low pip score) moves his cavalry in support of his warband columns.


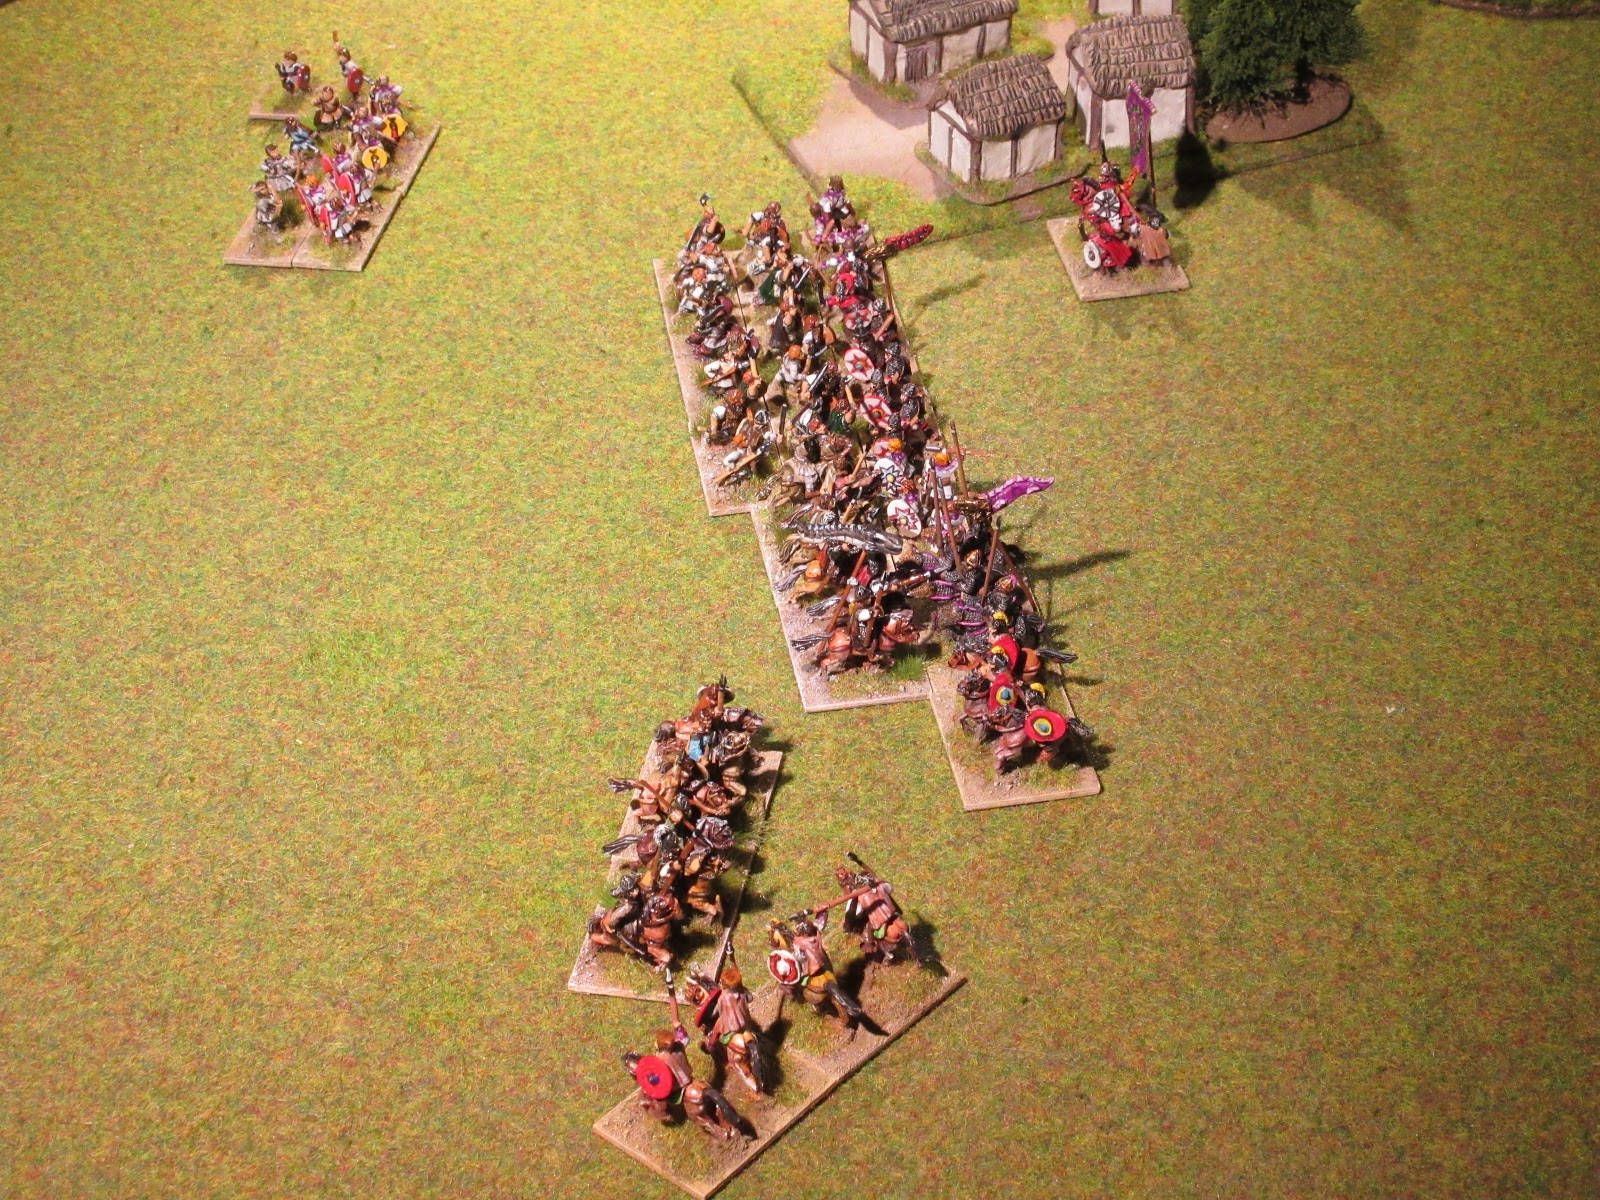
Leaving the warband to contest ownership of the hill, the Vandal cavalry attack the legion.


The Vandal effort is repulsed and the Roman general and Illyriani add their weight to the conflict in the centre.


After several bounds of locked combat, Roman units begin to waver and the auxilia are slowly being pushed off the hill. The Vandal chieftain and other nobles take advantage of the moment to charge the exposed flanks to secure a decisive victory. Score 4 – 0 for the Vandals.


Game 2
Finding them in similar terrain, Rome made use of the river to secure their right flank. The cavalry, deployed in two ranks echeloned back on the left as the open terrain would prove ideal for the Vandal cavalry.


Wheeling the infantry line to the left, Rome advanced toward the Vandal position. The cavalry reserve moved up in support.


Vandal assaults were less than ideally coordinated, but the ensuing combat did create casualties for both sides. (1 – 1).


Too late to save half the legion, the Roman reserve cavalry added their arms to the conflict in the centre. The Alani, seeming awakened from their lethargy struck a unit of equites in the flank and after a long struggle the remaining half of the legion fell beneath the swords of the Vandal infantry. Score 4 – 2 for the Vandals.


Game 3
For the final battle, Rome extended their entire force in one long line. The Vandals formed theirs in like fashion with their infantry on the right and Alani allies on the left.


The Roman centre and left flank engaged the main Vandal force. The Auxilia forced the warband back as did the Roman cavalry. The legion feeling the full force of the Vandal chieftain and his guard broke leaving a gaping hole in the Roman line.


Leaving the Vandal leader to the reprisal of the remaining legionnaires, the Roman cavalry surged forward to try and destroy the remaining Vandal cavalry with the Illyriani on their way to seal their fate from the rear.  


Single handed, the Vandal chieftain and guard had destroyed the entire legion (2 elements), but elsewhere Vandal losses were mounting quickly (3 elements). Turning his attention to the fighting near the field, the Vandal leader closed in on the rear on a unit of auxilia and was rebuffed for his effort.

Likewise, the Alani were able to pick off an isolated unit of equites bringing the score even (3 – 3).


The decisive blow came when the last Vandal cavalry were destroyed by the joint effort of the Roman general and the clibanarii. Score 4 – 3 for the LIR.


II/66    Early Vandal 200 – 442 AD Terrain type: Arable, Aggression 3
1 x general (3Kn), 2 x nobles (3Kn), 7 x warriors (4Wb), 1 x Alans (LH), 1 x dregs (Ps).

Thursday 23 November 2017

Later Imperial Roman vs. the Tervingi

The Tervingi are listed as enemies for both the western and eastern halves of the Roman Empire. Since both matches would place them in arable terrain, we will have this match series set in the west for the first two games. Game three the ‘c’ sub-list or the Alaric option will be used to add variation.

The Tervingi have crossed the Danube, therefore Rome is defending. The terrain is arable and uses the compulsory BUA (hamlet) with hills, wood and rocky ground as optional choices.


Game 1
Rome as defender deployed in front of a small hamlet with the infantry lining the crest of a gentle hill and the equites Illyriani protecting the open left flank. The remaining cavalry were positioned as a reserve behind the main battle line. To match the Roman line, the Tervingi reduced the number of dense columns. This measure still came up short and so the Tervingi chieftain decided a brisk attack toward the Roman centre would compensate for their smaller front.


The move forward by the Tervingi took longer than expected, but this did offer an opportunity to expand their formations.


The Tervingi nobles drove the clibanarii back but their supports were experiencing difficulty in keeping up.  On the left flank, the Tervingi warriors could make no impression on the legionnaires and auxilia they were swept off the hill incurring high casualties and costing the battle. Score 0 – 4 for the LIR.


Game 2
The Tervingi were now defending a gentle hill where they positioned the bulk of their infantry and the remainder of the army formed a refused line. It was here, the Tervingi chieftain expected a cavalry assault. As expected, the Romans formed two groups; an infantry group deployed between the hamlet and wood and a second, consisting of all the cavalry, formed on their right flank.


Noting a hesitation on the Roman side, the Tervingi moved off their hill position to attack the Roman infantry.


The decisive move forward did flat foot the Roman infantry, losing a unit of auxilia, but the remainder of the line did hold.


The battle moved to and fro for both groups and the clibanarii placed them as the critical linchpin to block the Tervingi chieftain’s attempt to flank exposed Roman units.


This lasted for a few turns with both sides experiencing casualties, but by now, the Tervingi were gaining the upper hand (3 – 2). The final blow came when the clibanarii were destroyed leaving a gap too large to restore. A general retreat was called. Score 3 – 4 for the Tervingi.


Game 3
For this last game Rome meet the barbarians from list ‘II/65c’ which represent Alaric and his successors. These field fewer foot warriors, but more mounted nobles (Kn) which should prove a greater threat to Roman infantry.

Rome is defending and secured their right flank on a hamlet and the open left flank was guarded by all the cavalry. To meet the Romans, all the Visigothic noble cavalry are positioned on the right flank opposite the Roman cavalry while all the infantry are deployed facing their infantry.


The Visigothic cavalry rein in their horses and keep pace with the infantry forming one large division aimed at the Roman centre.


As the distance closes, the Visigoths reveal their true intent by wheeling their group toward the infantry line. Rome has initiated their own countermeasures by sending auxilia on the right to sweep the barbarian supporting units away.


Well timed, the dense columns together with half the cavalry crash into the Roman line.


This results in a fearful loss of the legion and supporting auxilia. The loss of Visigothic skirmishers is small compensation for a devastating turn of events (3 – 2).


Seeing their comrades, the clibanarii reeling from Visigothic fury, the equites Armigeri join the melee bringing an end to a ‘near run thing’. Score 3 – 4g for the LIR.


II/65b Tervingi & Early Visigothic 200 – 407 AD Terrain type: Arable, Aggression 3
1 x general (3Kn) or (4Wb), 1 x noble cavalry (3Kn), 8 x warriors (4Wb), 2 x archers (Ps).

II/65c Alaric and successors 408 – 419 AD Terrain type: Arable, Aggression 3
1 x general (3Kn), 2 x noble cavalry (3Kn), 1 x cavalry (3Kn or LH), 4 x warriors (4Wb), 2 x freed German prisoners of war and other ex-slaves (4Wb or 7Hd), 2 x archers (Ps).

Wednesday 15 November 2017

Later Imperial Roman vs. the Later Moorish

Against the Middle Imperial Roman and Early Byzantine, the Later Moorish have not won any matches but have made their opponents battle hard for their victories. Difficult hills will hamper command efficiency and this will be a matter of greater concern for the Roman commander than his wily opponent. 

The terrain comprised of the compulsory difficult hills (2x) and woods (2x) and a BUA with an option to exchange the latter with a river in game three.

Game 1
Rome deployed its forces in a standard formation between a village and a series of high hills; an infantry line with the legion in centre flanked by auxilia and a second line comprising of cavalry and a detachment of auxilia to act as a flank guard.

The Moorish bandits formed two wings with all its cavalry formed up on the open plain and on the hill tops could be seen a horde of various infantry.


On the Roman right, auxilia and skirmishers would keep the Moorish infantry occupied while the infantry line moved steadily forward against the Moorish horse.


Unexpected as a desert sand storm, the Moorish lines surged forward to attack the Roman infantry. These easily repelled the Moorish light horse but on the right the skirmishers were now deprived of their auxilia support (1 – 1).


The skirmishers withdrew to a suitable spot on a second hill. This had the desired effect of luring their infantry forward exposing an open flank; an opportunity seized upon by the equites Illyriani. The Moorish cavalry were now is disarray as the infantry line pushed forward with the support of the cataphracts driving the light horse back. This left their chieftain and supporting troops exposed.


A desperate struggle ensued with the Moorish chieftain falling destroying the heart of the army. The bandits fled the field. Score 4g – 2 for LIR.


Game 2
A line of hills cut through both deployment lines, such that Roman infantry were positioned in few open spaces available. One hill offered a good defensive position and the legion deployed between the hill and a small village.


The Moors, deployed in three groups concentrated their effort on seizing the Roman held hill. The assault would be covered on both flanks by light horse.


The Moorish infantry gained a foothold on the hill while below, Moorish light horse were heavily engaged with a unit of Roman heavy cavalry.


The Roman centre and right finally stirred into action and moved forward (low pip scores). Unfortunately, the effort came too late as the hill on their left was covered with jubilant bandits waving Draco standards and vexillum. Score 4 – 0 for the Moors.


Game 3
Rome, now defending, deployed its infantry on the forward slope of a hill leaving the open ground below for the cavalry to form their battle line. From their hill position, the Moorish infantry formed a centre ‘division’ with cavalry deployed on either flank.


Noticing that the Moorish cavalry were a diversion, the Roman infantry moved forward in the direction of the Moorish held hill and Roman cavalry, moving in two groups, moved in support.


Emboldened by their previous victory, the Moorish cavalry hurled themselves against the Roman left wing and while Moorish infantry moved forward to occupy the second Roman cavalry wing. The latter were encouraged as they could see a column of Moorish light horse had infiltrated the Roman rear.  


The Moorish chieftain leading the charge severely mauled and dispersed a unit of Roman heavy horse. Next to fall were the equites Illyriani (2 – 0).


The savage fury did not relent as the Moors brought down a second equites wiping out the Roman left flank. Seeing a unit of auxilia broken, the Roman commander called a general retreat. Score 4 – 1 for the Moors.


II/57 Later Moorish 26 – 496 AD Terrain type: Hilly, Aggression 1
1 x general (LH or Cv), 5 x horsemen (LH), 6 x javelinmen (3Ax or Ps).


Saturday 11 November 2017

Later Imperial Roman vs. the Alani

All three battles took place in Alani homeland, the steppes. This would raise the level of difficulty for the Romans and that was the point of the exercise. A a bolt-shooter was selected as an option. Two gentle hills are compulsory and two pieces of scrub were added to the selection for the defending player to position.

Game 1
Rome took up a position at the base of one gentle hill with a second line positioned at its crest in reserve. Both front and flank were covered by scrub but aware of the mobility of the Alani, these would be easily traversed without difficulty.


A strong Alani left wing moved to threaten the Roman right prompting its general to dispatch units from the reserve to strengthen the right. At this moment the Alani elite levelled their lances and crashed into the legion and successive ranks added to the impetus helping to grind the legionnaires into the ground (2 – 0).


Recovering from the shock, the Roman general recalled troops from the inactive left to fill the exposed position and the equites Illyriani bested the Alani to front were rallying on their commander.


The battle now resembled a brawl with units concerned with their isolated conflicts, but this worked to the advantage of Rome (2 – 2). The following bound, the situation became desperate as Alani could not evade the increasing number of Roman units assailing them from different directions. Score 4 – 2 for LIR.


Game 2
For the second engagement Rome deployed its infantry in defensive formation around a gentle hill. From a central position the Roman general could view the entire battle array of the Alani cavalry; elite formations in the centre flanked by light horse archers.


Out of the range of the ballistae, the Alani elite snaked their way toward the refused Roman wing. This same wing was assailed by waves of Alani horse archers. Shortly thereafter, Alani were attacking all up and down the Roman line.


The equites Illyriani overtook and mauled the horse archers but by this time the Alani horse were covering the slopes of the Roman held hill (3 – 2).


The situation took a critical turn when the Roman general was unhorsed sending a cheer from the Alani elite. To add to the confusion of the moment shouting and cheering could be heard at the other end of the hill bringing the score even (4 – 4g).


Rome responded to the loss of their general by falling on nearby Alani and cutting down enough Alani to send them fleeing off the battlefield. Score 6 – 4g for LIR.


Game 3
The final battle found Rome in an exposed position with no nearby cover.


Forming a defensive line Rome was pressed on all sides by an aggressive Alani attack. Those horse archers on the right bested a unit of Illyriani while on the opposite flank the ballistae scored its first kill (1 – 1).


The small victory by the ballistae was short lived as the Alani levelled their lances and crashed into the Roman line and those Alani on the left joined the general attack. This time, Fortuna was nowhere to be seen as the Alani quickly dispatched Roman light troops, equites and legionnaires in short order. Score 1 – 5 for the Alani.


II/58 Alans 50 – 1500 AD Terrain type: Steppe until 400 AD, then Arable, Aggression 1
1 x general (3Kn or LH), 2 x nobles (3Kn) or horse archers (LH), 8 x horse archers (LH), 1 x peasant archers (Ps).