Tuesday 30 January 2018

Later Imperial Roman vs. the Sarmatian

Continuing the historical series, the Later Imperial Rome make use of the eastern order of battle. The number of cavalry and legionnaires have been increased and among the auxilia there are now sagittarii (4Bw) present.

The first conflict takes place north of the Danube which allows the Sarmatians to fight in 'homeland' territory of the steppes. This may pose a problem for Rome as the terrain will be devoid of features to use in deploying troops. 
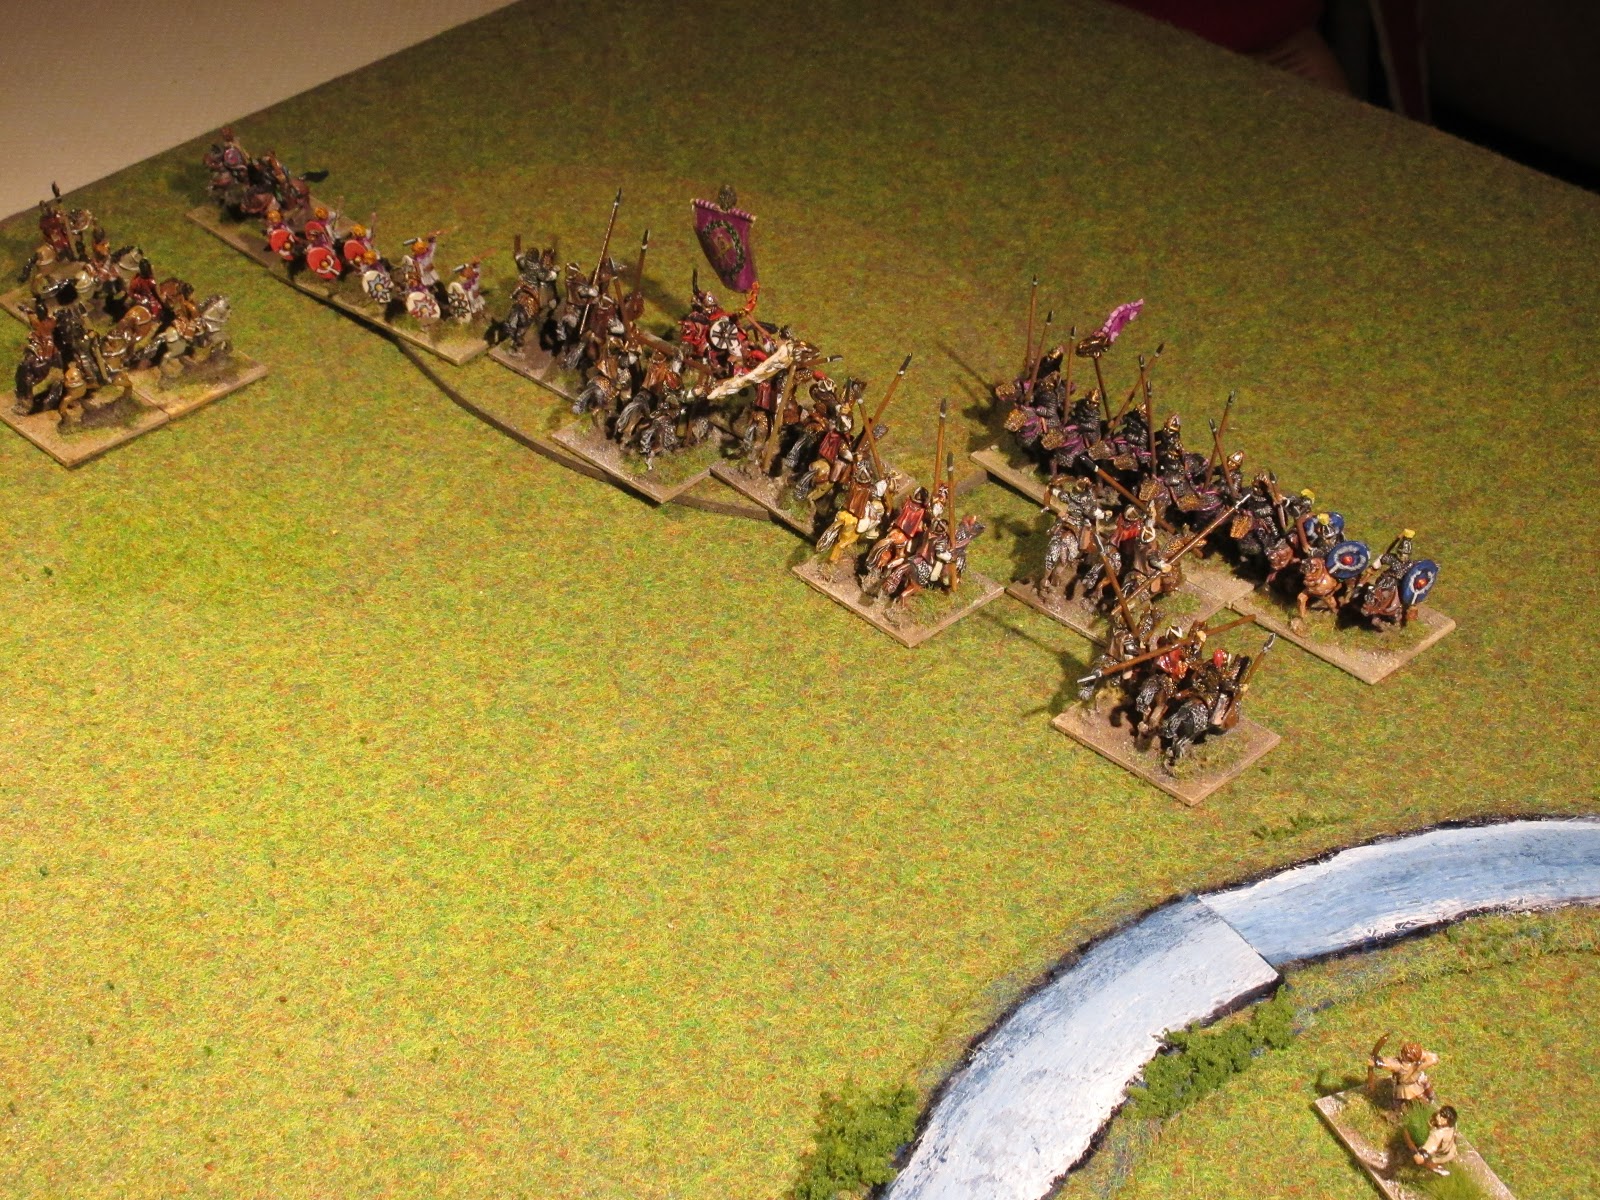
Game 1
Rome on the offensive, caught the Sarmatian scrambling out of their village to reach open ground. As Rome advanced only half the Sarmatian cavalry could deploy to the far bank.


Taking advantage of the situation, the magister militum launched his cavalry against the Sarmatians exiting the village and placed the auxilia in a position to delay those Sarmatians crossing the river downstream.


Lacking room to manoeuvre, the Sarmatians took heavy casualties (two elements) as the clibanarii and equites fell on them in front and both flanks.


Rome also suffered casualties, but the losses on the Sarmatian were significant enough to send them fleeing. Score 4 – 2 for the LIR.


Game 2
In the second battle, the Sarmatian have called on the Alani (allies) to defeat the Roman invader; these are deployed on the wings.  Rome having the advantage of ground would be content to hold it.


Seeing the main effort was directed toward the centre, the Magister Militum moved his left wing to bring the sagittarii into effective bow range. On the right, the equites and skirmishers could deal with the Alani while the clibanarii and auxilia in centre, moved forward to meet the Sarmatians on the slope of a gentle hill.


In centre, the Sarmatians unleashed a fury at the Romans holding the hill and in two successive bounds their chieftain destroyed half the clibanarii. Other Sarmatian cavalry in support of their general were less than successful as they were sent back to the base of the hill. On the Sarmatian left, the Alani made up for their poor performance and destroyed a unit of light horse.


The final act came when the Sarmatian chieftain signalled his Alani and Sarmatians to finish the Romans off, then doubling back he sought out the Roman general. The last onslaught delivered the fatal blow leaving the legion and the magister militum littering the battlefield. Score 7g – 2 for the Sarmatian.


Game 3
The final battle found both armies constrained by the limited open ground and so both deployments were just under 800 paces.


Rome remained steadfast on their hill position offering the Sarmatians ample time to coordinate their assault.


Noticing how easily Roman skirmishers had crossed the river (paltry), the Sarmatian chieftain dispatched light troops of his own to deal with them. Meanwhile, the Sarmatians and Alani struck the Roman line.


Sarmatian lances found their mark destroying the legion and its supporting auxilia leaving the Magister Militum dangerously exposed. Elsewhere, the Alani and the Sarmatian cavalry were being repulsed and losing ground but both sides experienced heavy casualties (3 – 3).


Following their orders, the auxilia ignored the ‘rally’ signal from their general and fell on the Alani destroying more than half their number.  Seeing the Alani essential destroyed and his Sarmatian cavalry repulsed elsewhere, the Sarmatian chieftain called for a retreat. Score 5 – 3 for the LIR.


II/26 Sarmatian 310 BC – 375 AD Terrain type: Steppe, Aggression 3
1 x general (3Kn), 7 x noble cavalry (3Kn), 1 x scouts (LH) or noble cavalry (3Kn), 3 x archers (Ps) or noble cavalry (3Kn) or levied farmers (7Hd). 

Friday 26 January 2018

Historical Match up – Later Amorite vs. Ammu Bedouin 1500 BC

Marauding desert tribes have disrupted the caravan trade between Qatna and Tadmor and to remedy the situation a number of Amorite city states cobbled together an army to punish the sand dwellers. All the engagements took place in the fertile region (arable terrain) between the two cities.

The armies
The Later Amorite has a large retinue of troops armed with sickle sword and battle axes (3Bd). These are supported by a good number of skirmishers (Ps) and two units of auxilia, all under the command of a general who rides a platform car (Cv).  


In contrast, the Bedouin are lighter armed with auxilia (3Ax) making up the bulk of the army and supporting them are two units of bow (3Bw) and three units of skirmishers (Ps). Both armies have no difficulty in negotiating difficult terrain, but fighting such terrain is not favourable for the Amorite retinue.  


Game 1
The Amorite formed a battle line with the auxilia making use of a village to secure their left with the majority of infantry extending a broad front from that point. Skirmishers posted to the extreme right completed the battle formation. Half of the Bedouin could be seen facing the Amorite centre while the remainder were lurking behind the woods.


The Amorite general noted the hesitancy among the Bedouin leaders and so moved his own force quickly forward. Within minutes, the distance between the two lines closed the clash that followed gave the Amorite first blood.


The Amorite were surprised at the lack of resistance from the Bedouin as victory was quickly achieved. Despite the few casualties incurred. the score was 4 – 2 for the Later Amorite.


Note: Call it treachery or the sand dwellers were in disfavour by the gods, but three turns with consecutive low pip scores essentially immobilised the Bedouin. Historians will most likely lay the blame to tribal discord.  


Game 2
Driving the Bedouin out of the fertile valleys, the sand dwellers were caught near the foothills. Deployed in the valley floor was the main strength of the Amorite force with the remainder securing the heights on the right directly facing the Bedouin tribesmen.


The tribesmen were this time less lethargic and were now focusing their main assault on the heights held by Amorite skirmishers and auxilia. These quickly formed a line along the crest as the Bedouin approached.


Atop their hill position, the Amorite held long enough to allow the main body time to engage the Bedouin right formed on the valley floor. Inspired by the presence of their leader, the Amorite retinue quickly cut down Bedouin archers and javelinmen bring the score to 3 – 1.


The Amorite suffered another casualty but seeing the entire right wing collapse, the Bedouin called for a retreat. Score 4 – 2 for the Later Amorite.


Game 3
A third victory against the Bedouin would ensure peace for a few years so the Amorite were quite optimistic about a final engagement. Both armies formed their battle line, each resting their flanks on covering terrain; here the Amorite made use of a small village and the slope of a nearby hill. Directly to their front, the Bedouin formed their line between two woods.


The Bedouin quickly moved their left against the Amorite right positioned in the village while the remainder of the army held their place.


Confident that the village would hold against the Bedouin assault, the Amorite centre and left wing advanced against the Bedouin. The auxilia on the left were surprised by a sudden Bedouin attack from the wood, but this did not slow the main assault on the centre. To support the effort around the village a unit of Amorite infantry were sent to support the defenders.


In the centre, the Amorite infantry were meeting stiff resistance incurring a casualty. Despite the loss the battle line still held. 


Any confidence that had been felt before was shattered as isolated Amorite units were disappearing under swarms of tribesmen surrounding them. The situation took an unexpected turn as the entire right wing collapsed giving the victorious Bedouin an open gateway to the Amorite camp. To save the army a general retreat was called for. Score 4 – 3 for the Ammu Bedouin.


Note: Both Early Bedouin and Early Libyan have scored a victory proving the ‘impossible is possible’. 

Sunday 21 January 2018

Historical Match up – Old Kingdom Egyptian vs. Early Libyan horde

Throughout the history of Old and Middle Kingdom Egypt, the tribesmen of Libya were a constant nuisance raiding the delta regions and fertile areas along the Nile River. There are instances of Libyans reaching as far south as the Nubian frontier and this will be played out in the coming month. 

In this second match, the Early Libyans are joined by other tribes (6 x 5Hd) eager to enjoy the riches that the western delta has to offer.
   

Game 1
Libya on the attack caught the Egyptian forces with their backs against one of the tributaries of the Nile. With little space to deploy, the Egyptians used the marshes to protect their left flank and used the conscript infantry to protect their right.


Libyan strategy was simple, overwhelm the Egyptian centre, while all the skirmishers on the right flank would infiltrate the marshes and turn the enemy left. On the opposite flank, Libyan archers would support the main assault.

Egypt elected to meet the tribesmen and so wheeled their battle line to conform to the Libyan advance. Skirmishers on the right flank would hopefully keep the enemy archers busy.


Archery fire from both sides effectively disrupted each other’s battle line.


Egyptian skirmishers on the left were becoming casualties but they still held their ground. Egyptian archery held the first wave of tribesmen in check so conscript infantry was able to fall on their flank destroying a unit.


A second unit of horde fell to the discipline ranks of the Egyptian conscripts leaving a gaping hole in the Libyan line. The Egyptian skirmishers on the right flank now close on the Libyan archers. 


With the Libyan archers destroyed, their general had no option but to call a general retreat. Score 6 (+2 x 5Hd) – 1 for Egypt.


Game 2
Fleeing south, presumably to reach the Fariyum Oasis before turning west, the Libyans continued their pillaging. The Egyptians rapidly caught up with the Libyans ready for battle. With their left flank resting on an area of marsh their battle line seethed with masses of tribesmen.

The Egyptians took up their standard battle formation with the nomarch, retinue and archers in the centre, conscript infantry to the right and skirmishers extending both flanks. The menfat were positioned behind the archers as a reserve.


Both lines moved steadily forward, Egyptian skirmishers on the right were eager for battle and moved ahead of the main battle line.


The Libyans struck first forcing the Egyptian line to buckle, but it held.


After a brisk fight on the Egyptian right the skirmishers fled with both units of tribesmen in hot pursuit. Elsewhere, the Egyptians held the line and in some places were able to force the tribesmen back even destroying a few units.


The battle took a desperate turn as the tribesmen now free of the Egyptian skirmishers fell on the exposed flanks of the conscript infantry. Their opportune aid help destroy the conscripts leaving one unit of menfat to hold off five times its number.


The nomarch assessing the situation knew the only chance of victory was to attack the reserve units where their leader was positioned. The Libyan chieftain gleefully accepted the challenge attacking the nomarch and his retinue. 


Better armed, the Egyptian retinue forced the Libyan chieftain back, but this had the unfortunate result of moving closer to Libyan help. Elsewhere, the Libyan tribesmen succeeding in taking out the menfat and archers that remained of the centre leaving the nomarch with scant few troops to call for a retreat. Score 6 (+2 x 7Hd) - 5 (+ 2 x 5Hd) for the Early Libyan.


Game 3
Pleased with their victory over the Egyptians, the Libyans returned north to continue plundering the rich delta region. Encamped on the banks of the Nile, the Libyans found a smaller force of Egyptians barring their path homeward. In the distance, the sails of Egyptian ships could be seen approaching the encampment and so the Libyans readied themselves for battle.


Leaving a small force to deal with an eventual attack from the water, the Libyan tribesmen hurled themselves at the awaiting Egyptian battle line.


Through poor communication (low pip scores) the Libyan leader witnessed the destruction of his reserve units and the oncoming line of enemy infantry. Further away, the Egyptian nomarch was experiencing a similar plight as he was surrounded by horde of tribesmen.


Breaking out of his encirclement, the Egyptian nomarch could see the standard of the Libyan leader fall announcing his passage to the afterlife. Without a leader, the Libyans fought desperately to survive.


The end came when the menfat destroyed the corps of archers bringing the battle to a close. Score 7g (+3 x 5Hd) – 1 for Egypt.


Sunday 14 January 2018

Historical Match up – Old Kingdom Egyptian vs. Later Amorite

During the end of the Middle Kingdom dynasties, the Egyptians first encounter the Later Amorite {1} in what is modern day Palestine. In this test series, the Later Amorite are the aggressor (3) and face the Egyptians on their home territory which is represented here as the eastern delta (Littoral).

Game 1
Returning from another successful campaign against the Ammu Bedouin the Egyptian army found its path blocked by the Amorites. An eventual confrontation with the Amorites had been expected, but not so early in the campaign season. 

The Amorite deployed in three ‘divisions’, one securing the approach along the beach, a second further inland on the outskirts of marsh land and the remainder of the army formed a battle line between the two divisions. 

The Egyptians nomarch positioned his main body in centre with skirmishers deployed to both wings and in reserve were the conscript infantry. 


The Amorite moved its wing ‘divisions’ ahead of the main body as it moved slowly forward. Amorite auxiliaries moved forward in support of each wing. Egyptian skirmishers moved to counter the enemy on the flanks.


Altering his plan, the nomarch moved the conscripts forward while giving them supporting archery fire. The conflict now escalated as the left wing required the aid of the menfat to support the skirmishers.


Both lines were now wholly engaged in battle and within minutes the formations dissolved into smaller battles with casualties falling heavily on both sides (2 – 2).


It was not long before the situation became desperate as the Egyptian right collapsed leaving the nomarch no further choice but to call a general retreat. Score 4 – 3 for the Later Amorite.


Game 2
Making use of a night march, the Egyptian army slipped past the Amorite to march further south. Re-equipping the army from the supply ships that shadowed the column, the nomarch decided to utilize a number of transports to assault the Amorite from the sea.

Anticipating a seaborne assault, the Amorite shortened their line facing the Egyptians and placed auxiliaries to patrol the shoreline and a unit of warriors were held further back as a reserve. 


The main Egyptian force advanced slowly forward giving the archers plenty of time to find their targets as the seaborne column disembarked from their boats, these were the menfat joined by a unit of skirmishers. More skirmishers had slipped past the marshland to support the seaborne effort. 


The Egyptian left wing had quickly taken care of the Amorite skirmishers forcing their general to commit his reserve. Both lines were heavily engaged but the situation for the nomarch became desperate as his line of archers crumbled under the blows of Amorite axes (3 – 2, Amorite).  


With the line of archers gone, the nomarch found himself surrounded and died. Despite inflicting further casualties among the Amorite, the Egyptians lost heart with the loss of their leader and fled the battlefield. Score 5g – 3 for the Later Amorite.


Game 3
The final blow to the Egyptian army came when they found the Amorite blocking their retreat back to Egypt. The Egyptians deployed closer to the shoreline with the conscript infantry positioned forward of the line leaving the newly elected commander to deploy the remainder of the army further back allowing the archers additional room to use their bows.


The Amorite did not take the bait and focused first on stripping the Egyptians of its ‘wings’. For this task he sent the skirmishers supported by auxiliaries to open the battle. The main body moved slowly forward.


The Amorite plan worked well as the casualties on the Egyptian flanks mounted with no loses for the Amorite (3 – 0).


Egyptian archers kept the Amorite tribesmen at bay but elsewhere the situation became desperate as the army was now encircle on both flanks (3 – 1).


The slaughter now became general such that the army broke leaving their newly elected general to cover its rear. Score 6 (+horde) – 1 for the Later Amorite.


{1} this period of history the Egyptian kingdom is split between a Lower Egypt controlled by the Hyksos and an independent Upper Egypt ruled from Thebes. The unification of the kingdom was known was begun by Kamose during his reign (1555 BC – 1550 BC). Ahmose I (1549 BC – 1524 BC) continued the war against the Hyksos finally expelling them from Lower Egypt. In all likelihood, any conflict with the Later Amorite would place it after this period.